 dont hammer too much
pflege und wartung deines instruments (english below)
maßgeblich für die einstellungen an deinem instrument ist die bespielbarkeit. millimeterangaben können eine richtlinie sein, zwei gitarren genau gleich einzustellen würde wohl aber immer eines der beiden instrumente zu kurz kommen lassen. wenn du doch messen willst, tu das bitte mit dem instrument in spielposition - wenn sie auf dem rücken liegt hat so eine gitarre natürlich eine ganz andere saitenlage etc.
ein instrument von gebrauchtegitarre.com ist mit sogenannten 10er saiten bespannt, konkret mit d‘addario exl 110, ein 4-saitiger bass mit 45er saiten von warwick.
bei einem saitenwechsel mit gleichbleibender saitenstärke gleichen herstellers ist bzgl. der halskrümmung eigentlich nichts zu beachten, oktavreinheit prüfen schadet jedoch nicht (siehe unten).
bei einem saitenstärkenwechsel beachte bitte:
deine sattelkerben sind nun entweder zu eng oder zu weit, was stimmprobleme verursachen kann.
dünnere saiten haben weniger zugkraft, weshalb sich der hals leicht nach hinten ziehen, die saitenlage dadurch flacher werden wird und die saiten zu schnarren beginnen, weil sie leichten kontakt zum nächst höhergelegenen bund des gegriffenen tones haben.
dickere saiten haben mehr zugkraft, weshalb sich der hals leicht nach vorn ziehen, die saitenlage dadurch höher werden wird, wodurch die gute bespielbarkeit leidet.
halskrümmung
beides wird tunlichst nicht über die höheneinstellung an der brücke, sondern mittels halsspannstab (truss rod) eingestellt, was mit etwas vorsicht zu bewerkstelligen ist wie folgt: spanne in gestimmtem zustand einen kapodaster vor den ersten bund(stab) und drücke eine saite am 15. bund herunter. die saite funktioniert nun wie ein lineal. der sich so am 7. bund ergebende abstand zwischen bundoberkante und saitenunterkante sollte bei e-gitarren etwa 0,3 - 0,5 mm betragen (in worten: fast nix), bei bässen etwa 1-1,5 mm.
dieses maß kann bzw. muss bei instrumenten, deren bünde nicht ordentlich abgerichtet sind (also unterschiedliche höhenlevels haben, was man mit einer kreditkarte leicht per "kippelprobe" rausfinden kann) etwas erhöht werden. nur bitte keine banane aus dem hals machen, sondern möglichst gerade einstellen. ton und bespielbarkeit werden es dir danken.
spanne entweder den truss rod im uhrzeigersinn um zu hohem saitenzug entgegenzuwirken und den nach vorn gebogenen hals zu begradigen.
oder löse den truss rod gegen den uhrzeigersinn um zu niedriger saitenspannung entgegenzuwirken und den nach hinten überbogenen hals zu lockern.
beides bitte mit viel gefühl und in achtelumdrehungsschritten. wenn du viel kraft für diese einstellung aufwenden musst, stimmt möglicherweise etwas nicht. lass dann besser eine fachperson ran.
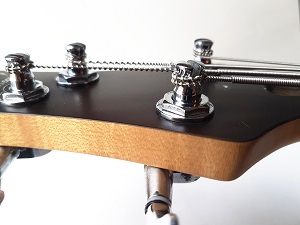
ähm ... wo ist dieser truss rod eigentlich? den zugang dazu findest du meist an deiner kopfplatte, offen sichtbar oder unter einer abdeckung. pech haben alle, deren zugang am halsfuß angebracht ist - da müssen alle einstellungen in eventuell mehreren anläufen ohne saiten mit abgenommenem hals durchgeführt werden.
ganz grober fahrplan hierzu: wenn es in den ersten fünf bünden zu sehr schnarrt, ist der hals zu gerade. schnarrt es in der mitte oder oben zu sehr, ist der hals zu krumm. schnarrt es überall, ist die halskrümmung gut, aber möglicherweise die saitenlage zu flach oder dein anschlag zu heavy.
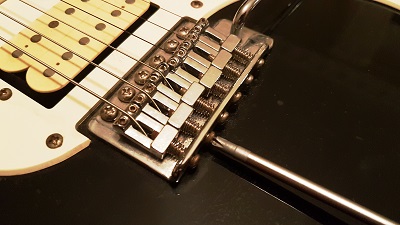
saitenlage
ich beginne das setup einer e-gitarre bei etwa 2 mm saitenabstand von oberkante bund bis unterkante saite am tiefen e, etwas weniger beim hohen e, gemessen am 12. bund (bass etwa 3 mm). von dort aus kann die reise geringfügig in beide richtungen gehen, je danach, welche spielweise gewünscht ist bzw. welcher sound. eine sehr flach eingestellte saite hat bei zu festem anschlag bald die angewohnheit, an den bünden zu schnarren (dies geschieht meist am nächst höheren des gegriffenen bundes oder aber etwa auf halber gegriffener saitenlänge). obendrein entfaltet sich der ton oft besser, wenn die saiten nicht zu dicht am griffbrett kleben.
du darfst nun experimentieren: mit einem 1,5 mm inbusschlüssel kannst du - sofern du kein instrument mit tune-o-matic-brücke gekauft hast - die reiter unter den einzelnen saiten höhenverstellen.
merke dir die anzahl der drehungen, die dein inbusschlüssel macht, damit du bei bedarf alles wieder rückgängig machen kannst (tip: eine 10 cent münze misst etwa 2 mm).
achte darauf, dass dein saitenhöhenverlauf in etwa dem radius deines griffbretts folgt, d und g dürfen dabei minimal heraus stehen. schau dazu von hinten über die gitarre. wenn du eh schon mal so komisch kuckst, prüfe auch gleich, ob die einzelnen reiter waagerecht stehen, beide inbusschrauben eines reiters gleichmässig weit raus stehen.
telecasterspieler mit drei doppelreitern müssen oft kompromisse bei der oktav-intonation in kauf nehmen und die reiter so einstellen, dass öfter gebrauchte akkorde reiner klingen als selten benutzte. waagerecht stehende reiter sind hier möglicherweise wenig zielführend (griffbrettradius).
bei o.g. tune-o-matic-brücken geht es einfacher, hier verstellst du an den zwei bolzenschrauben die ganze brücke in ihrer höhe, der radius ist baulich bedingt schon vorgegeben. auch hier schadet es nicht, sich zu merken, was man tut - beide schrauben eine halbe umdrehung hoch oder runter, gitarre wieder stimmen und ausprobieren.
bei beiden brückenarten würde ich die saiten vor dem erhöhen der saitenlage etwas entspannen, also etwa zwei ganztöne runter stimmen.
oktavreinheit
wenn du die saitenlage signifikant änderst, ist im anschluss die oktavreinheit zu prüfen. vergleiche dazu mittels stimmgerät den gegriffenen ton am 12. bund mit dem eine oktave tiefer erklingenden ton der leersaite. ist der gegriffene ton am 12. bund zu hoch, muss der saitenreiter vom hals weg bewegt werden. ist er zu tief, zum hals hin. vorsichtiges herantasten per schraube, die von hinten (bei tune-o-matic-bridge auch mal von vorn) in den jeweiligen saitenreiter führt. das ergebnis sollte sein, dass die sechs reiter zwei schräg verlaufende linien bilden.
 Intonation LPl Type
  Intonation S Type
saitenwechsel
wann überhaupt? je nach belieben und gutem ton. bassisten sind da eher zurückhaltend, da basssaiten verhältnismässig teuer sind. anfängern empfehle ich, nach einem jahr mal darüber nachzudenken, vielspielern eher nach sechs monaten bzw. dann, wenn die saiten mit schmutz zugesetzt sind und dumpf klingen.
gitarristen dürfen auch im anfängerstadium nach drei monaten mal wechseln, am besten auch gleich alle saiten, nicht nur die gerissene, damit das klangbild wieder homogen wird.
wie mach ich das? es gibt da verschiedene techniken. allen gleich scheint mir, dass bei umsponnenen saiten etwa anderthalb bis zweieinhalb, bei blanken saiten etwa fünf bis sieben windungen um den wirbel ausreichen, um eine saite stimmstabil festzuhalten.
ich persönlich ziehe die saite straff, schneide umsponnene etwa 3 cm, blanke etwa 5 cm hinter dem stimmwirbel ab und führe sie durch die querbohrung, so, dass sie etwa 0,5 cm auf der anderen seite heraus tritt.
bei mechaniken mit hohlem schaft, in den man das saitenende einsteckt, einfach alles 1 cm länger.
dann beginne ich zu drehen (saitenkurbel hilft) und führe die saite mit der rechten hand immer unter spannung erst über den 0,5-cm-rauskuck-schniepel, dann bei der zweiten umdrehung und allen folgenden unter diesen. wenn die saite auf stimmung ist, sollte sie an dem wirbel anliegen und die einzelnen wicklungen sauber nebeneinander liegen.
ansehen kann man sich das ganz grob hier.
 Saiten Aufziehen S Type
umsponnene saiten mit rundem kern müssen vor dem abschneiden einmal geknickt werden, damit die umwicklung nicht aufdrieselt. (gibt es das wort?)
bei einem bass, gibt es für gewöhnlich nur mechaniken mit hohlem schaft. dort schneide ich die handgespannte saite etwa 6 cm hinter der jeweiligen mechanik ab, stecke ein, knicke um und wickle bis schluss, von oben nach unten.
 aufgezogene bass saiten
nutze den saitenwechsel auch gleich, um einmal alle schrauben festzuziehen und dein griffbrett zu reinigen. ein baumwolltuch und zwei (ich wiederhole: zwei!) tropfen griffbrettöl sind dafür eine gute investition, speiseöle lieber nicht. lackierte ahorngriffbretter natürlich nicht ölen, sondern feucht ab- und trocken nachwischen.
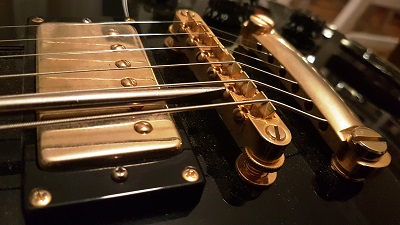
tonabnehmer
nach dem einstellen der saitenlage kann eine justage der tonabnehmer sinnvoll sein. als faustregel empfehle ich bei single coils (strat, tele etc) einen abstand von etwa 5 mm zur saite. an der hohen e saite kann der tonabnehmer etwas näher als an der tiefen e saite, sodass er etwas schräg steht.
bei bässen stelle ich einen abstand von etwa 8 mm ein.
bei gitarren mit humbuckern (les paul, sg etc) darf es weniger sein - etwa 2 bis 3 mm sind hier möglich.
nimm dir einfach zeit und einen schraubenzieher und probiere etwas herum. es geht darum einen kompromiss zu finden: die tonabnehmer sollen einerseits in der lautstärke gut zueinander passen. andererseits soll aber auch jeder tonabnehmer für sich gut klingen. schon wenige umdrehungen an den höheneinstellschrauben sind hörbar. tu was dir gut gefällt, nur einfach nicht zu nah an die saiten.
grundsätzliches
jedem instrument gefällt eine relative luftfeuchte zwischen 40 – 65 % ganz gut, drüber und drunter nicht so - da sollte der luftbe- bzw. -entfeuchter ran. ein gutes hygrometer kostet nicht viel und dein instrument sowie deine gesundheit werden es dir danken.
wenn fragen zu deiner gitarre auftauchen, kein ton mehr raus kommt, du die saiten nicht drauf bekommst, die stimmung nicht mehr hält oder du dein tremolo doch mal benutzen möchtest – rufste an.
alles in allem – jetzt aber viel freude am spielen!
 dont hammer too much
care and maintenance of your instrument
a decisive factor for the settings of your instrument is its playability. millimetre specifications can be a guideline, but setting two guitars exactly the
same would probably always leave one of the two instruments out in the cold. if you do want to take measurements, please do so with the
instrument in the playing position - if it is lying on its back, the guitar has a completely different string action.
an instrument from gebrauchtegitarre.com is strung with so called 10s strings, specifically with d'addario exl 110, a 4-string bass with 45s strings
from warwick.
if you change the strings with the same thickness of the same manufacturer, you don't have to pay attention to the neck curvature, but checking
the octave purity won't hurt (see below).
when changing strings, please note:
your saddle notches are now either too narrow or too wide, which can cause tuning problems.
thinner strings have less tension, so the neck will pull back slightly, the string action will become flatter and the strings will start to buzz because
they have slight contact with the nearest higher fret of the note being played.
thicker strings have more tension, so the neck will pull forward slightly, the string action will be higher, which will reduce the playability.
neck curvature
if possible, both are not adjusted via the height setting on the bridge, but by means of a truss rod, which can be done with a little care as follows:
when tuned, stretch a capo in front of the first fret (rod) and press a string on the 15th fret (rod). the string now works like a ruler. the resulting
distance between the upper edge of the 7th fret and the lower edge of the string should be about 0.5 mm (in words: almost nothing) for electric
guitars and about 1-1,5 mm for basses.
this distance can or must be slightly increased for instruments whose frets are not properly aligned (i.e. have different height levels). just don't
make a banana out of the neck, but set it as straight as possible. tone and playability will thank you.
either tension the truss rod clockwise to counteract excessive string tension and straighten the neck that is bent forward.
or loosen the truss rod counterclockwise to counteract too low string tension and to loosen the backward bent neck.
please do both with a lot of feeling and in eighth turn increments. if you have to use a lot of force for this adjustment, something might be wrong.
better let a professional do it.
um... where is this truss rod actually? you can usually find the access to it at your head plate, openly visible or under a cover. bad luck for all those
whose access is at the base of the neck - there, all adjustments have to be done in possibly several runs without strings with the neck removed.
very rough schedule here: if the first five frets buzz too much, the neck is too straight. if the top buzzes too much, the neck is too crooked. if it
buzzes everywhere, the neck curvature may be good, but the string action is too flat or your stroke too heavy.
string action
i start the setup of an electric guitar at about 2 mm string spacing from the top edge of the fret to the bottom edge of the string at the low e, a little
less at the high e, measured at the 12th fret (bass about 3 mm). from there the journey can go slightly in both directions, depending on the desired
playing style and sound. a very low string will soon have the habit of buzzing at the frets (this usually happens at the next higher fret or about
halfway up the length of the string). on top of that, the sound often unfolds better if the strings are not too close to the fretboard.
you may now experiment: with a 1.5 mm allen key you can - if you didn't buy an instrument with tune-o-matic bridge - adjust the height of the
saddles under the individual strings.
remember the number of turns your allen key makes, so that you can undo everything if necessary (tip: a 10 cent coin measures about 2 mm).
make sure that the height of your strings follows the radius of your fingerboard, d and g should stick out minimally. look over the guitar from
behind. if you already have a funny look, make sure that the individual riders are standing horizontally and that both allen screws of one rider are
sticking out evenly.
telecaster players with three double riders often have to make compromises in octave intonation and adjust the riders so that used chords sound
purer than rarely used ones. riders standing horizontally may not be very effective here (fingerboard radius).
with the above mentioned tune-o-matic bridges it is easier to adjust the height of the whole bridge with the two bolts, the radius is already given
by the construction. it doesn't hurt to remember what you are doing - both bolts half a turn up or down, tune the guitar again and try it out.
with both types of bridges i would relax the strings a little before raising the string action, so tune down about two whole notes.
octave purity (intonation)
if you change the action (string height) significantly, check the intonation of the string. use a tuner to compare the fingered tone on the 12th fret
with the tone on the open string that sounds an octave lower. if the fingered tone on the 12th fret is too high, the string rider must be moved away
from the neck. if it is too low, move it towards the neck. carefully approach it with a screw, which leads from behind (with tune-o-matic-bridge also
sometimes from the front) into the respective tailpiece. the result should be that the six tailpieces form two diagonal lines.
 intonation st type
 intonation lp type
changing strings
when at all? depending on your taste and the sound you want. bass players tend to be reluctant to use them, because bass strings are relatively
expensive. i recommend that you think about it after a year, and that frequent players think about it after six months or when the strings are dirty
and dull.
guitarists are allowed to change the strings after three months, even in the initial stage. it's best to change all strings, not only the broken one, so
that the sound becomes homogeneous again.
how do i do that? there are different techniques. it seems to me that with wound strings about one and a half to two and a half turns around the
peg, with bare strings about five to seven turns around the peg are enough to keep a string in tune.
i personally pull the string taut, cut off wound strings about 3 cm, bare strings about 5 cm behind the tuning peg and guide them through the
cross hole so that they emerge about 0.5 cm on the other side.
for machine heads with a hollow shaft into which the end of the string is inserted, simply make everything 1 cm longer.
then i start to turn (string crank helps) and with my right hand i always guide the string under tension first over the 0.5 cm rasp, then at the second
turn and all the following ones under these. when the string is in tune, it should lie against the peg and the individual windings should lie neatly
next to each other.
 strung up st style
wound strings with a round core must be bent once before cutting them off, so that the winding does not trickle up. (does the word exist?)
on a bass, there are usually only machine heads with a hollow shaft. there, i cut the hand wound string about 6 cm behind the respective machine
head, insert it, bend it and wind it until the end, from top to bottom.
 strung up bass
use the string change to tighten all screws and to clean your fretboard. a cotton cloth and two drops of fretboard oil are a good investment, but
don't use edible oils. of course, don't oil varnished maple fretboards, but wipe them with a damp cloth and dry them.
pickups
after adjusting the string action, it can be useful to adjust the pickups. as a rule of thumb, i recommend a distance of about 5 mm from the pole pieces of the pickup to the string for single coils (strat, tele, etc.). the pickup can be a little closer to the high e string than to the low e string, so that it is at a slight angle.
for basses, i set a distance of about 8 mm.
for guitars with humbuckers (les paul, sg etc) it can be less - about 2 to 3 mm is possible.
just take your time and a screwdriver and try it out a bit. the point is to find a compromise: on the one hand, the pickups should fit together well in terms of volume. on the other hand, each pickup should sound good on its own. even a few turns of the height adjustment screws are audible. do what you like, just don't get too close to the strings.
basic information
every instrument likes a relative humidity between 40 - 65 % quite well, over and under not so much - that's where the humidifier or dehumidifier
should come in. a good hygrometer does not cost much and your instrument and your health will thank you for it.
if you have any questions about your guitar, no sound comes out, you can't get the strings on it, the tuning doesn't hold or you want to use
yourtremolo after all - call me.
all in all - but now have fun playing!